A tour description is a clear and engaging summary of a travel experience. It explains where the tour goes, what travelers will do, how long it lasts, what is included, and what makes the experience worth booking.
A well-written tour description can turn a travel website visitor into a confirmed traveler. It helps potential customers understand the destination, activities, itinerary, pricing, and overall experience they can expect.
However, writing an effective tour description involves more than simply listing places and activities. The content should be informative, engaging, easy to scan, and written for the right type of traveler. It should answer important questions while helping readers imagine themselves enjoying the experience.
In this guide, you will learn how to write a tour description that attracts attention, communicates essential details, and generates more bookings.
Key Highlights
- A complete tour description should include key details like the overview, highlights, itinerary, pricing, inclusions, exclusions, FAQs, and booking information to help travelers decide.
- Writing a tour description involves creating a clear title, engaging content, accurate details, itinerary, FAQs, and a strong call to action to encourage bookings.
- Avoid unclear titles, missing details, excessive promotion, poor formatting, and keyword stuffing to create a trustworthy and effective tour description.
What Should You Include in a Tour Description?
A complete tour description should include the key details travelers need before booking. It should clearly cover the following information:
- Tour overview: A short summary of the tour and its main purpose.
- Destination and main attractions: The places, landmarks, and highlights travelers will visit.
- Tour duration: The total length of the tour, such as hours, days, or nights.
- Day-by-day itinerary: A clear schedule showing what happens each day.
- Activities and experiences: The main activities travelers can take part in during the tour.
- Inclusions and exclusions: What the package covers and what travelers must pay for separately.
- Meeting and pickup details: The meeting point, pickup time, and available transport options.
- Group size and traveler requirements: The group limit, age rules, fitness level, or required documents.
- Price and booking information: The tour price, payment terms, and booking conditions.
- Cancellation and safety details: The cancellation policy, safety guidance, and important travel rules.
- Frequently asked questions: Clear answers to common questions about transport, meals, clothing, accessibility, children, weather, and booking changes.
Including these details helps travelers understand the full tour package and make a confident booking decision.
How to Write a Tour Description Step by Step
To write the best tour description, present your title, overview, trip facts, itinerary, inclusions, exclusions, FAQs, and booking details in a clear order. Each section should give travelers accurate information, build trust, and encourage them to book.
Step 1: Start With a Clear and Compelling Tour Title
Your tour title should explain the experience at a glance. Include the destination, duration, main activity, or tour type when these details help travelers understand the package quickly.
Use a simple structure such as:
Duration + Destination + Main Activity or Tour Type
Examples include:
- 7-Day Everest Base Camp Trek
- 3-Day Rara Lake Hiking Tour
- Upper Mustang Cultural Jeep Tour
- Kathmandu Heritage Walking Tour
- Chitwan Wildlife Safari Package
Use the primary destination and activity naturally in the title. A descriptive title helps travelers understand the tour instantly while also making it easier for search engines to identify what the page is about. Avoid vague or overly promotional titles that do not clearly describe the experience.
A clear title helps travelers recognize the tour, compare it with other options, and understand the main offer before reading the full description.
Step 2: Create a Strong Tour Overview
Your tour summary should give travelers a quick view of the experience. Mention the destination, main attraction, key activity, and overall tour style in a few clear sentences.
Keep this section brief and informative. It should help travelers understand what the tour offers before they move to the detailed overview, itinerary, and trip facts.
Naturally include important travel terms and destination names that travelers are likely to search for. Write for people first while using relevant keywords where they fit naturally.
For example:
Explore Upper Mustang through historic villages, ancient monasteries, dry mountain landscapes, and local cultural experiences on a guided journey through northern Nepal.
Step 3: Add Accurate Trip Facts
Trip facts help travelers check the main tour details quickly. Present this information in a clear and easy-to-scan section near the top of the page.
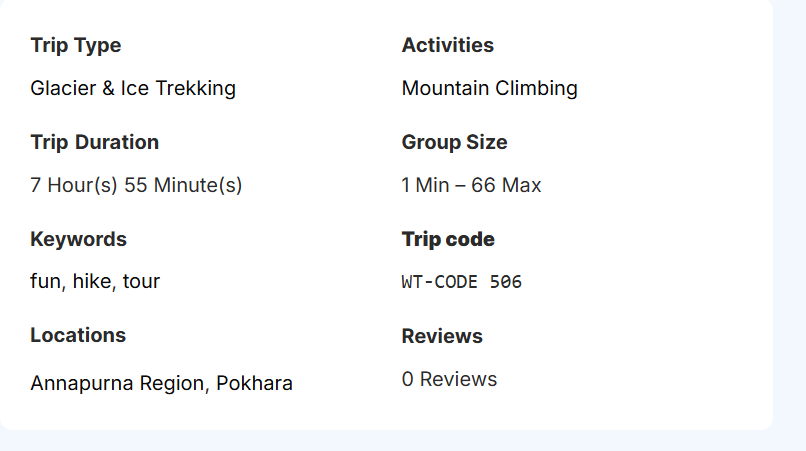
Include details such as:
- Destination
- Trip type
- Main activities
- Duration
- Group size
- Difficulty level
- Minimum age
- Maximum altitude
- Best season
- Accommodation type
- Transportation
- Starting and ending location
Make sure every fact matches the actual tour and itinerary. Clear trip facts help travelers decide whether the tour suits their time, budget, fitness level, and travel needs. Well-structured trip facts also improve page readability and can help search engines better understand the tour information.
Step 4: Create a Detailed Tour Overview
The detailed overview should explain the complete tour experience. Describe the destination, route, major attractions, local culture, scenery, activities, and overall travel style.
Start with the main purpose of the tour. Then explain what travelers can expect throughout the journey. You can also mention important places, local experiences, accommodation style, and transportation when they help travelers understand the package.
Use destination names, attractions, and related travel terms naturally throughout the content. Instead of repeating the same keyword multiple times, use relevant variations and write in a way that feels natural. This improves readability while helping search engines understand the page’s topic.
Focus on explaining the experience and benefits rather than simply listing attractions.
Step 5: Write the Itinerary in Travel Order
Present the itinerary in the same order travelers will experience the tour. Divide multi-day tours by day. For one-day tours, arrange the schedule by time, stop, or activity.
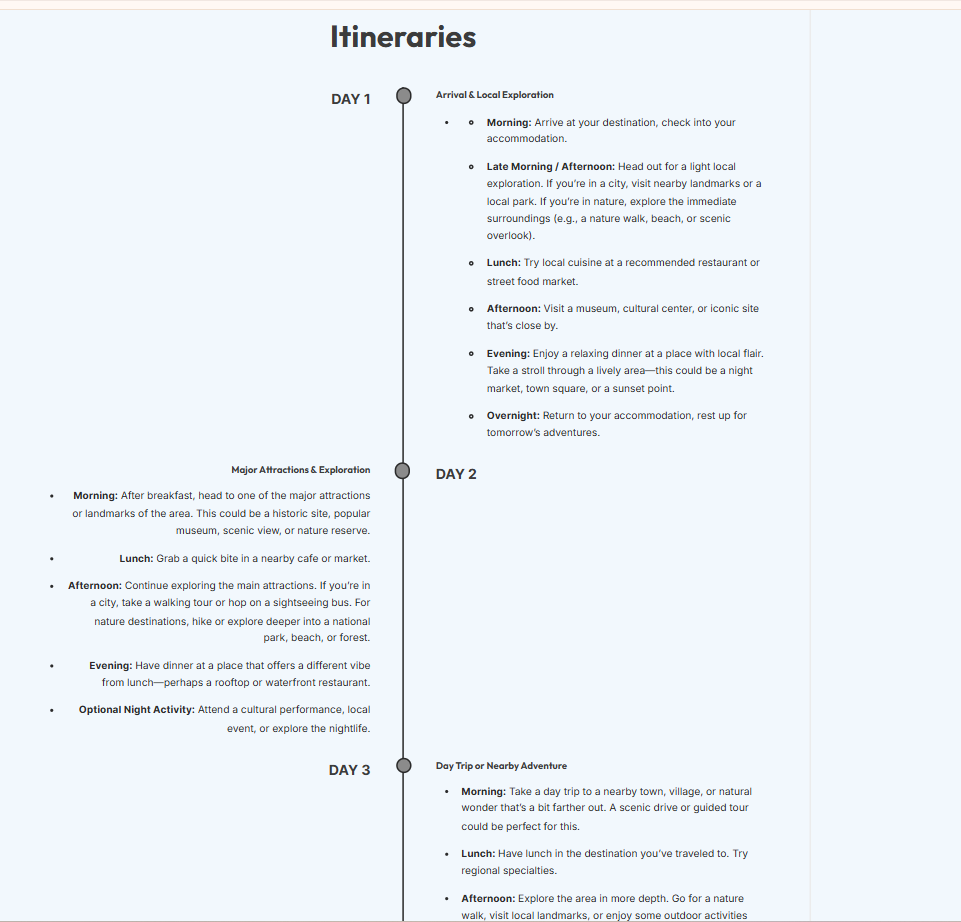
Each section should explain the starting point, route, main activity, attractions, travel time, and final stop. Add distance, altitude, meals, accommodation, and transportation when they affect the day.
A clear itinerary helps travelers understand the pace of the trip. It also shows what happens each day and how the full journey fits together. Detailed itineraries can also improve the overall relevance of your page by naturally including locations, activities, and landmarks associated with the tour.
Step 6: List the Tour Inclusions
The inclusions section should explain what the package price covers. This helps travelers understand the value of the tour and estimate their total costs.
Include confirmed services such as accommodation, meals, transfers, local transportation, domestic flights, guides, permits, entrance fees, equipment, and taxes.
Write each inclusion clearly and specifically. Mention the number of hotel nights, meal plan, transport type, or guide service when those details are available. Clear, detailed information also helps reduce duplicate customer questions and improves the overall quality of the page.
Step 7: Explain the Tour Exclusions
The exclusions section should show which costs travelers must pay separately. Place it close to the inclusions section so visitors can compare both easily.
You may mention international flights, visa fees, travel insurance, personal expenses, tips, optional activities, personal equipment, and emergency costs when they apply.
Clear exclusions help travelers plan their total budget. They also reduce confusion before and after booking, improving user experience and building trust with potential customers.
Step 8: Add Tour-Specific FAQs
Add FAQs that answer questions travelers may still have after reading the main tour details. Focus on topics that may affect their booking decision.
You can answer questions about difficulty, fitness, age limits, weather, meals, accommodation, transport, permits, insurance, equipment, accessibility, payments, and cancellations.
Keep each answer direct and specific to the tour. Useful FAQs help travelers make confident decisions, reduce repeated inquiries, and naturally address common search queries that potential customers may enter into search engines.
Step 9: End With a Strong Booking Call to Action
Finish the tour description by telling travelers what they should do next. The call to action should connect directly to the booking or inquiry process.
Examples include:
- Check Available Dates
- Book This Tour
- Reserve Your Spot
- Request a Custom Itinerary
- Send an Inquiry
- Talk to a Travel Expert
You can support the call to action with a short sentence that reinforces the main benefit of the tour.
For example:
Ready to explore the ancient villages and dramatic landscapes of Upper Mustang? Check the available departure dates and reserve your jeep tour today.
Near the call to action, include essential booking details such as the starting price, deposit requirement, availability status, payment options, and expected confirmation process. This gives travelers the information and direction they need to take the next step. A clear call to action also encourages user engagement, which can improve the overall performance of your tour page.
You may also read: How to Write a Travel Itinerary?
Tour Description Example
Annapurna Base Camp Trek – 10-Day Himalayan Adventure
Tour Overview
Experience one of Nepal’s most rewarding trekking routes on this 10-day Annapurna Base Camp Trek. This journey takes you through traditional Gurung and Magar villages, lush rhododendron forests, terraced farmland, and breathtaking alpine landscapes before reaching Annapurna Base Camp at an altitude of 4,130 meters. Along the way, you’ll enjoy panoramic views of Annapurna I, Machapuchare (Fishtail), Hiunchuli, and other Himalayan peaks while experiencing the warm hospitality of local mountain communities.
Ideal for adventure seekers and nature lovers, this guided trek combines spectacular mountain scenery, cultural encounters, and a well-planned itinerary suitable for trekkers with a moderate level of fitness.
Trip Facts
| Trip Detail | Information |
|---|---|
| Destination | Annapurna Region, Nepal |
| Trip Type | Guided Trekking Tour |
| Duration | 10 Days |
| Difficulty | Moderate |
| Maximum Altitude | 4,130 m (Annapurna Base Camp) |
| Group Size | 2–12 Travelers |
| Best Seasons | March–May, September–November |
| Accommodation | Hotels in Pokhara and mountain teahouses |
| Meals | Breakfast, Lunch, and Dinner during the trek |
| Transportation | Private vehicle and tourist bus |
| Start Point | Pokhara |
| End Point | Pokhara |
Detailed Tour Overview
The Annapurna Base Camp Trek is one of Nepal’s most popular trekking experiences, offering an excellent combination of mountain scenery, cultural heritage, and accessible trekking routes. Beginning from Pokhara, the trail gradually climbs through picturesque villages, dense forests, and scenic river valleys before entering the heart of the Annapurna Sanctuary.
During the journey, you’ll pass charming settlements such as Chhomrong, Bamboo, Deurali, and Machapuchare Base Camp. Each day offers changing landscapes, from subtropical forests to dramatic alpine terrain surrounded by towering Himalayan peaks.
Reaching Annapurna Base Camp is the highlight of the trek. Here, you’ll be surrounded by a natural amphitheater of snow-covered mountains, creating one of Nepal’s most unforgettable trekking experiences. Throughout the journey, experienced guides ensure your safety while sharing insights into local culture, history, and the unique environment of the Annapurna Conservation Area.
Itinerary
Day 1: Drive from Pokhara to Jhinu Danda and Trek to Chhomrong
Begin with a scenic drive followed by a moderate uphill trek through traditional villages to Chhomrong, the gateway to Annapurna Base Camp.
Day 2: Chhomrong to Bamboo
Descend to the Chhomrong Khola before climbing through lush forests filled with bamboo and rhododendron trees.
Day 3: Bamboo to Deurali
Continue through peaceful forests and narrow valleys while enjoying spectacular mountain scenery.
Day 4: Deurali to Annapurna Base Camp
Pass Machapuchare Base Camp before reaching Annapurna Base Camp, surrounded by panoramic Himalayan views.
Day 5: Sunrise at Annapurna Base Camp and Trek to Bamboo
Watch sunrise over Annapurna I and surrounding peaks before descending through alpine landscapes.
Day 6: Bamboo to Jhinu Danda
Retrace the trail and relax in the natural hot springs near Jhinu Danda.
Day 7: Return to Pokhara
Complete the trek and drive back to Pokhara for a relaxing evening.
Tour Inclusions
- Professional licensed trekking guide
- Accommodation during the trek
- Hotel accommodation in Pokhara
- Breakfast, lunch, and dinner during the trek
- Annapurna Conservation Area Permit (ACAP)
- TIMS Card
- Ground transportation
- First-aid support
- Government taxes and service charges
Tour Exclusions
- International airfare
- Nepal visa fees
- Travel insurance
- Personal trekking equipment
- Snacks and beverages
- Tips for guides and porters
- Personal expenses
- Emergency evacuation costs
Frequently Asked Questions
Is the Annapurna Base Camp Trek suitable for beginners?
Yes. Trekkers with good physical fitness and some hiking experience can comfortably complete the trek with proper preparation.
What is the best time to visit?
Spring (March to May) and autumn (September to November) provide the clearest mountain views and the most comfortable trekking conditions.
Do I need travel insurance?
Yes. Comprehensive travel insurance covering high-altitude trekking and emergency evacuation is highly recommended.
What type of accommodation is provided?
The trek includes comfortable mountain teahouses along the trail and hotel accommodation in Pokhara.
What should I pack?
Bring layered clothing, sturdy trekking boots, a sleeping bag (if required), trekking poles, rain gear, sunscreen, and a reusable water bottle.
Book Your Annapurna Base Camp Trek
Ready to experience the spectacular landscapes of the Annapurna region? Book your 10-Day Annapurna Base Camp Trek today and discover one of Nepal’s most iconic Himalayan adventures with experienced local guides.
Starting Price: USD 895 per person
Deposit Required: 20% to confirm your booking
Availability: Daily departures during the trekking seasons
Booking Options: Instant booking or custom private departures available
You may also read: Top SEO Strategies for Travel Websites for Better Rankings
Common Mistakes to Avoid When Writing a Tour Description
Common mistakes to avoid when writing a tour description include using vague titles, adding generic details, listing inaccurate trip facts, and presenting an unclear itinerary.
1. Using Vague or Generic Titles
Avoid giving your tour a title that is too broad or unclear, as it doesn’t tell travelers what the tour includes. Titles like Amazing Tour or Best Vacation fail to communicate the destination or activity. Instead, write a descriptive title that includes the destination, duration, or main experience so readers immediately understand what the tour offers.
2. Writing an Unclear Tour Overview
Don’t use the tour overview to fill space with general information or marketing slogans. If the overview doesn’t clearly explain where the tour goes, what travelers will experience, and why it’s worth taking, readers may lose interest. Keep the introduction focused on the destination, highlights, and overall experience.
3. Overloading the Description with Promotional Language
Avoid filling your description with exaggerated claims such as the best tour in the world or an unforgettable experience without supporting details. Travelers are more likely to trust descriptions that explain the actual activities, attractions, and experiences included in the itinerary rather than relying on excessive promotional language.
4. Omitting Essential Tour Details
One of the biggest mistakes is leaving out information that travelers need before booking. A tour description should clearly explain the duration, itinerary, accommodation, transportation, difficulty level, and other important details. Missing information can create confusion and increase the number of customer inquiries.
5. Writing Long and Difficult-to-Read Paragraphs
Avoid writing large blocks of text without any headings or formatting. Most travelers scan a page before reading it carefully, so long paragraphs can make important information difficult to find. Break the content into shorter paragraphs and organize it with headings, lists, and clearly defined sections.
6. Stuffing the Description with Keywords
Including relevant keywords helps search engines understand your content, but repeating the same phrase over and over can make the description sound unnatural. Instead of forcing keywords into every sentence, use destination names, attractions, and related travel terms naturally throughout the content. Prioritize readability over keyword repetition.
7. Copying Content from Other Tour Pages
Avoid copying descriptions from competitors or reusing the same content across multiple tours on your own website. Duplicate content provides little value to readers and can affect your site’s search performance. Write unique descriptions that accurately reflect each tour’s itinerary, attractions, and experiences.
8. Ignoring the Needs of Your Target Audience
Don’t assume every traveler is looking for the same experience. A family tour, cultural excursion, wildlife safari, and trekking adventure should each emphasize different benefits. Write with your intended audience in mind so the description answers their questions and highlights the experiences they value most.
9. Failing to Explain What’s Included and Excluded
Avoid making travelers guess what is covered by the tour price. If you don’t clearly list the inclusions and exclusions, visitors may misunderstand the package or hesitate to book. Always explain which services are included and which expenses travelers will need to pay separately.
10. Ending Without a Clear Call to Action
Don’t finish your tour description without telling readers what to do next. After learning about the tour, travelers should have a clear path to continue their booking journey. Include a call to action that encourages them to check availability, book the tour, request a custom itinerary, or contact your team for more information.
You may also read: How to Increase Travel Website Bookings?
Conclusion
A clear and well-organized tour description helps travelers understand the experience, compare the package, prepare for the journey, and book with confidence. It should bring together the tour overview, trip facts, itinerary, pricing, inclusions, exclusions, FAQs, and booking details in one consistent and easy-to-read page.
To make creating and managing these professional tour packages easier, WP Travel, a reliable WordPress travel booking plugin, provides all the essential tools needed to build a complete travel website. It allows you to create and manage unlimited tour packages with features such as detailed tour descriptions, itinerary builders, regular and sale pricing, trip duration, image galleries, maps, package inclusions and exclusions, FAQs, and many more options.
WP Travel offers a free version with essential tour management features, while WP Travel Pro provides advanced functionalities to help travel agencies expand their booking capabilities and offer a more customized experience.

FAQs
1. How long should a tour description be?
The ideal length of a tour description depends on the complexity of the package. A short day tour may only need a few hundred words, while multi-day trekking, adventure, or cultural tours require more detailed information about the itinerary, activities, accommodations, and travel requirements.
2. Should tour descriptions be optimized for SEO?
Yes, tour descriptions should be written with SEO in mind to improve visibility in search results. Use relevant destination names, travel activities, and related terms naturally throughout the content. However, avoid keyword stuffing and focus on creating helpful content that answers travelers’ questions and provides a better user experience.
3. How often should tour descriptions be updated?
Tour descriptions should be reviewed and updated regularly to ensure all information remains accurate. Update details whenever there are changes to pricing, itinerary, accommodation, availability, seasonal information, transportation, or booking policies. Keeping content updated improves customer trust and prevents confusion.
4. Can I create multiple tour packages on a WordPress website?
Yes, you can create and manage multiple tour packages on a WordPress website using a dedicated travel plugin like WP Travel. The plugin allows travel businesses to add unlimited tour packages based on their website hosting capacity, with features for managing descriptions, itineraries, pricing, galleries, maps, inclusions, exclusions, and booking details in one place.

Yam Chhetri is a WordPress expert specializing in travel plugins, themes, and website solutions. With 10+ years of experience, he helps tour operators and travel agencies find the best tools to build high-performing travel websites.
Yam provides expert insights on WordPress tour booking plugins, and travel website enhancements, helping businesses choose the right solutions. His in-depth plugin comparisons and industry analysis make it easier for travel entrepreneurs to navigate the digital landscape.